Preferences - Reports
- Nate Edwards
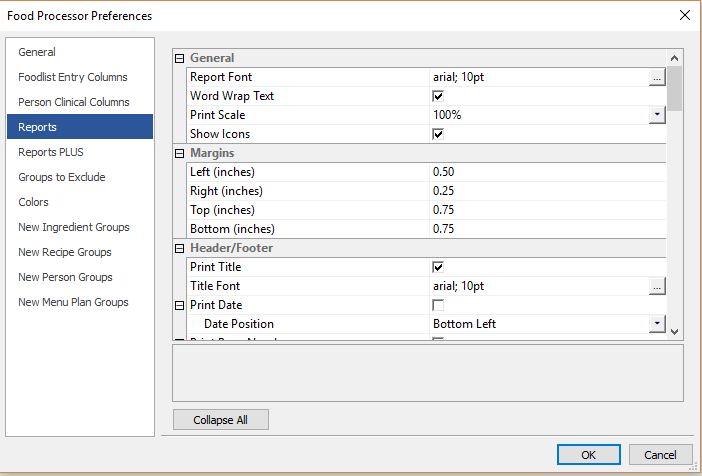
Reports Preferences encompass all Report printing settings including headers/footers, format, artwork, alignment and fonts.
General
REPORT FONT
You can format your reports for printing by selecting a specific font, font size, font style, effects and color.
- Click the ellipsis button.
- Make desired changes in the Font window.
- Click OK.
WORD WRAP TEXT
If the Item Name (generally the Ingredient name or Recipe name in the Spreadsheet and Recipe reports) exceeds the width of the on-screen display column, checking this box will force the name to continue on the line below for printing.
PRINT SCALE
Tell the program to scale your printout by choosing a size percentage here. Example: Select 50% to scale the printout to half the size. This will allow more reports to fit on a printed page.
SHOW ICONS
The small icons to the left of the food list items (recipe, ingredient, etc.) can be disabled by unchecking this box.
Margins
Specify the print area for the page by entering margins in inches from the edge of the page for Left, Right, Top and Bottom margins.
Header/Footer
PRINT TITLE
Check this box to print the title that appears in the Title Bar at the top of an on-screen report.
TITLE FONT
- Click the ellipsis button.
- Make desired changes in the Font window.
- Click OK.
PRINT DATE
- Check the Print Date box to print the current date on your reports
- Position the Date by selecting from the drop-down menu.
PRINT PAGE NUMBERS
- Check the Print Page Numbers box to print the current date on your reports
- Position the Page Numbers by selecting from the drop-down menu.
Note: The Date and Page Numbers will print in the same font as the report. For information on formatting the report font, see “Report Font” under “Printing Settings” earlier in this chapter.
Header
HEADER FONT
- Click the ellipsis button.
- Make desired changes in the Font window.
- Click OK.
HEADER TEXT
- To include Header Text (user-created) with your reports, type the Header text in the available space.
HEADER TEXT POSITION
- Select from Left, Center or Right from the drop-down menu. The Header will automatically align to your top margin.
HEADER IMAGE
File Path
- Click the ellipsis button and select the desired image file. Click the Delete button to delete.
Header Image Position
- Align the image on the page by selecting left, right or center.
Override Image Size
- Enter the new size values.
FOOTER
Footer Font
- Click the button.
- Make desired changes in the Font window.
- Click OK.
Footer text
- To include Footer Text (user-created) with your reports, type the Footer text in the available space.
Footer Text Position
- Select from Left, Center or Right from the drop-down menu. The Footer will automatically align to your bottom margin.
Report Sections
# OF NUTRIENT COLUMNS
- Enter the number of columns (one column contains both the nutrient name and its value) for printing. This applies to the Exchanges and Ingredients by percent weight Report Sections on the printed report.
RECIPE
- Check the boxes to include the sections in your Report printout.
INGREDIENT
- Check the boxes to include the sections in your Report printout
PERSON COLUMNS
- Check the boxes to include the sections in your Report printout