API Installation Procedures
- Scott Huiskens (Unlicensed)
- Patrick Murphy
- Christopher Wagner
Section 0 - Install Genesis R&D
NOTE: Verify if Genesis has already been installed. If so, verify that the installation is NOT using LocalDB. You can determine what type of database connection any given installation of Genesis is using by launching Genesis and clicking the “About” button from the “Home” tab in the ribbon. You will see a dialog like this (but with a populated Customer number and Serial code):
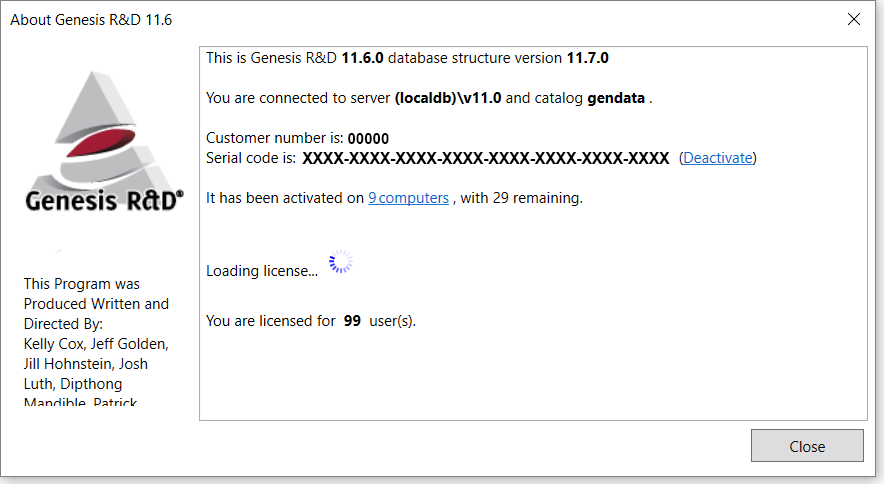
The API is incompatible with the standalone (localdb)\v11.0 instance.
If the “You are connected to server…” line shows “(localdb)\v11.0”
Please refer to the following to migrate the database to a shareable Full or Express SQL instance:
https://genesisrdfoods.zendesk.com/hc/en-us/articles/4415777273997-Move-your-database-and-program-to-a-new-computer-or-server-
If Genesis is configured to use a LocalDB connection, the process for switching from one install-type to another may depend on how many users are configured for the current install and other factors. A call to our Support staff would be the best approach to take for switching the Genesis installation over to a SQL Server instance.
If Genesis has not been installed, refer to the Custom install instructions below, to install with a shareable SQL Express instance:
If Genesis has been installed and is using a SQL Server instance of 2012 or higher, proceed to Section I.
SQL 2008 r2:
If you’re connecting to a SQL Server 2008 r2 instance, you’ll need to make sure you have the SQL Server 2012 Native Client installed. You can do this by going to “Add and Remove Programs” and searching for “native client.” If you see “Microsoft SQL Server 2012 Native Client” (or later) in your list of installed programs, you have the correct native client present. If not, you’ll need to download and install it. The 2012 Native Client can be obtained from here.
Once you have the 2012 Native Client installed, proceed to Section I.
- Launch the Genesis R&D installer.
- On the "Select Install Type" page, select "Custom Installation":

- Click "Next".
- On the "Select the features you would like to install" page, uncheck "SQL Server LocalDB 2012".
- If you are connecting to an existing SQL Server instance, click "Next". If you need to install a SQL Server instance locally to connect to, check "SQL Server Express 2014":
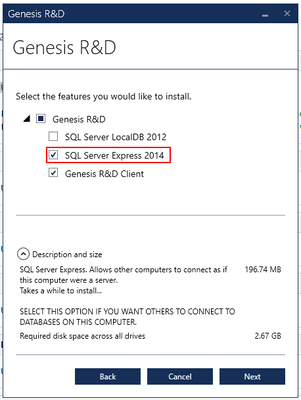
- Click "Next".
- Complete the installation.
Section I - Enable IIS on Windows
- Click the Start button.
- Type "Windows features".
- Select "Turn Windows features on or off" from the search results.
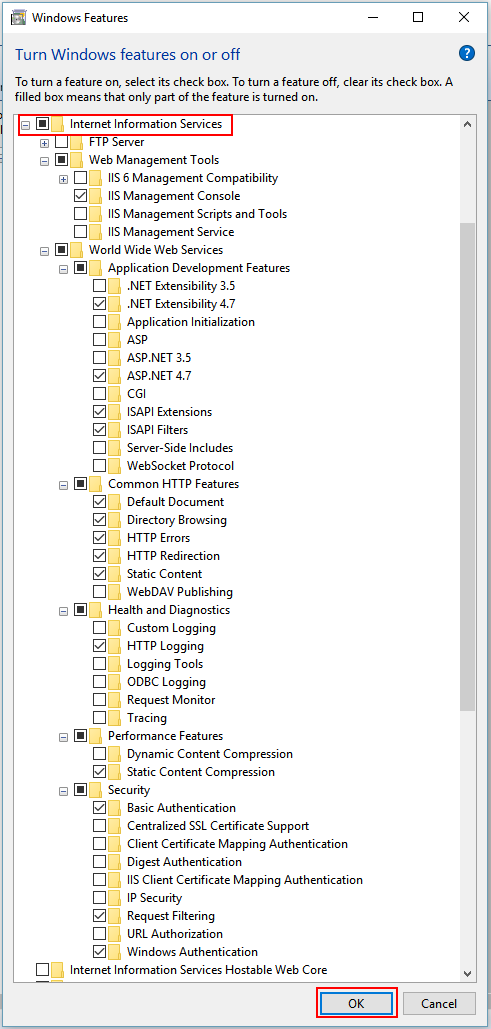
- Expand the "Internet Information Services Node".
- Ensure that the features selected match the screen shot:
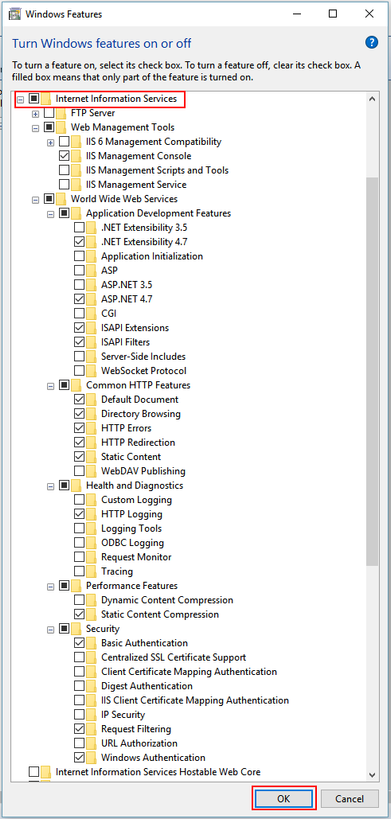
- Click "OK".
Again, wait for the newly selected features to be enabled. Assuming success, OK the confirmation.
Section II - Enable WCF on Windows
- Return to the "Turn Windows features on or off" dialog.
- Expand the ".NET Framework <version> Advanced Services" node.
NOTE: Typically, this is .NET Framework 4.7. If you have a more recent version of .NET installed, the ".NET Framework <version>..." will reflect that version number. - Expand the "WCF Services" node.
- Select "HTTP Activation":
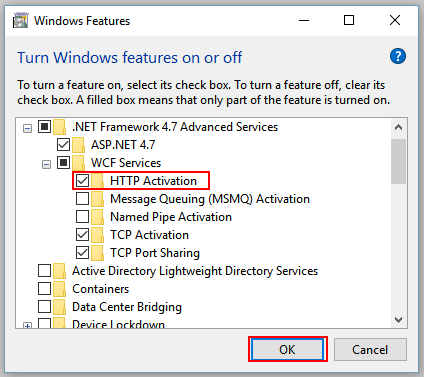
- Click "OK".
Again, wait for the newly selected features to be enabled. Assuming success, close the confirmation.
Section III - Enable SQL Authentication
- Launch SQL Server Management Studio (SSMS).
NOTE: If you installed Genesis per Section 0 using a local instance of SQL Server Express 2014, SSMS will not be installed. You will need to download and install SSMS from here. - Connect to the database server that hosts your GENDATA database.
- Right-click on the server name:

- Select "Properties".
- The "Server Properties" dialog will appear.
- Select the "Security" node:
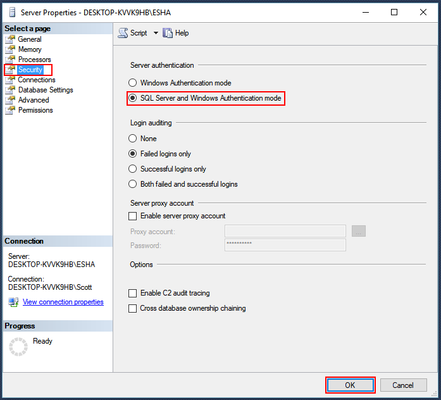
- Select the "SQL Server and Windows Authentication mode" radio button.
- Click "OK".
- Right-click on the server name again and select "Restart":
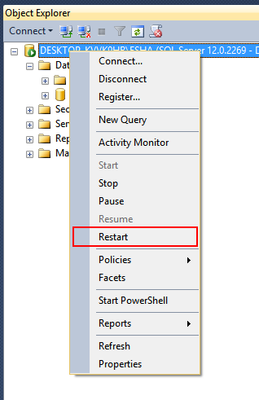
- Answer "Yes" when asked to confirm that you want to restart the server.
Section IV - Create an API User Login in the GENDATA Database
- Launch SSMS.
- Connect to the database server that hosts your GENDATA database.
- Expand the "Security" node.
- Right-click the "Logins" node:
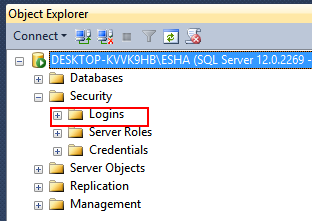
- Select "New Login".
- The "Login - New" dialog will appear:
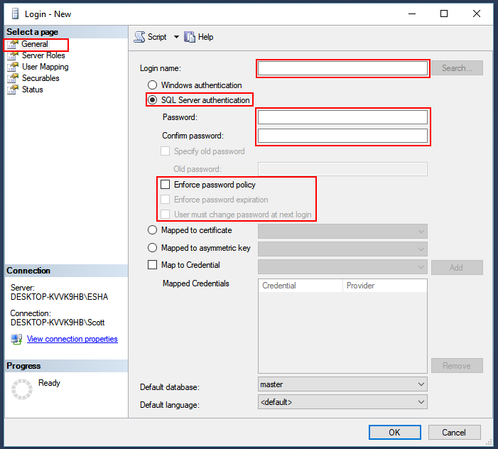
- Enter "APIUser" or some other login name for the "Login name" field.
- Select the "SQL Server Authentication" radio button.
- Create a password for the new login and make a note of it for later reference.
- Deselect "Enforce password policy" checkbox.
- Select the "User Mapping" node:
- Select the "gendata" database from the "User mapped to this login" list.
- Select "FPRole" from the "Database role membership for: gendata" list.
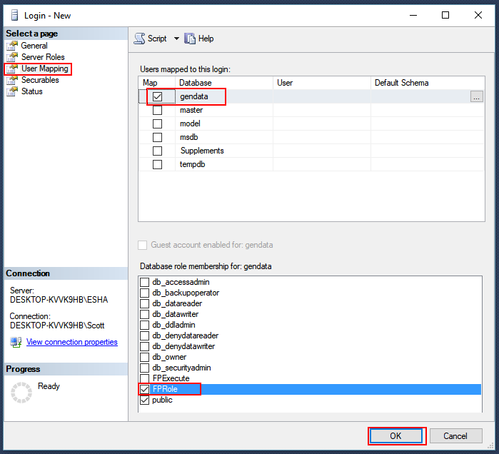
- Click "OK".
Section V - Install the API
- Install the API via the installer by right-clicking on the installer file and selecting "Run as administrator". Even if you are logged in as an admin, you will need to right-click and run as adminstrator.
- On the "System Validation" page, it will verify that all prerequisites have been completed. It will typically look as follows:
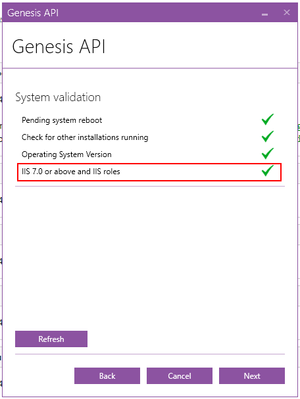
- If the "IIS 7.0or above and IIS roles" has a red "X", click the "Activate required Features and Roles" button that will appear.
- Click "Next".
- On the "SQL Server Connection" page, select the server you connected to with SSMS in the above steps in the "Server Name" drop down. If it's not in the list, manually enter it.
- Select the "Use SQL Authentication" radio button.
- Enter "APIUser" or the name you created in Section IV - Step 7 in the "User name" field.
- Enter the password you created in Section IV - Step 9 in the "Password" field.
- Select "gendata" from the "Select or enter a database" drop down.
- Click the "Test Connection" button. Assuming it succeeds, click the install button and allow the installation to complete.
Section VI - Final API Configuration
- Click the Start button.
- Type "IIS".
- Select "Internet Information Services (IIS) Manager" from the search results.
- The "Internet Information Services (IIS) Manager" window will appear.
- Expand the "Sites" node.
- Select the "GenesisAPI" node.
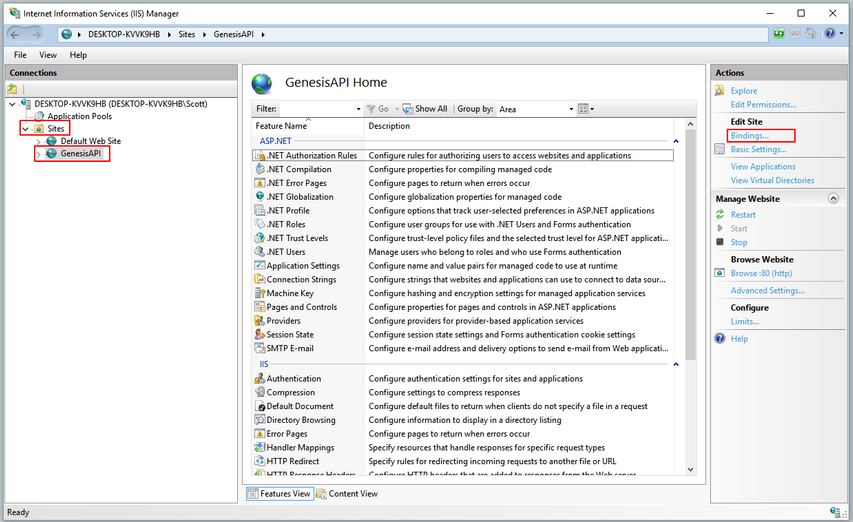
- Click the "Bindings..." link at the far right.
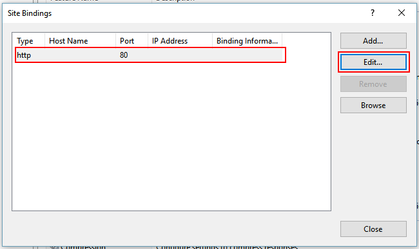
- The "Site Bindings" dialog will appear:
- Select the "http" row in the list.
- Click the "Edit..." button:
- The "Edit Site Binding" dialog will appear.
- Change the "Port" value to any available port (e.g. 8080), ensuring it does not conflict with any other sites in IIS, and make a note of the port number:
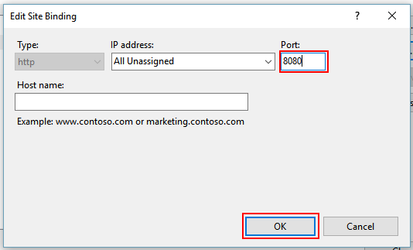
- Click "OK".
- Click "Close" from the "Site Bindings" dialog.
- Click the "Start" link, or "Restart" link (if already started/running) under the "Manage Website" section at the far right of the "Internet Information Services (IIS) Manager" window.
- Close the "Internet Information Services (IIS) Manager" window.
Section VII - Verify API Installation
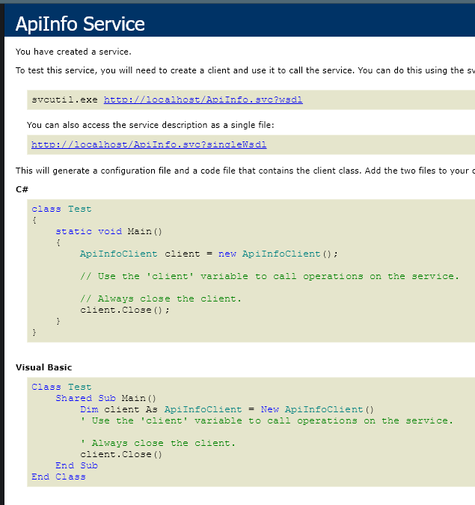
- Open a browser and navigate to http://localhost:<portnumber>/ApiInfo.svc, where <portnumber> is the number you changed the GenesisApi site to in Section VI - Step 11. You should receive the "ApiInfo.svc" page:
- Follow the steps to test with Postman.
- If you have gotten the ApiInfo.svc page (Section VII: Step 1) AND a valid response via Postman (Section VII: Step 10) then the API has been successfully configured.
On this page: