Note: This manual is for Genesis R&D Supplements 1.6 and earlier. The manual for versions 2.0 and later can be found here: Genesis R&D Supplements 2.0 Manual

Import a Formula

Import your Formula's Ingredients

Any ingredient contained in this Formula must first be present in Genesis.

Review your excel document

All Formula information must be repeated for each Ingredient in the Formula. In this example, you can see that the SAMPLE Ginseng Plus, Formula Notes, # containers, and the other Formula data are repeated for both Ingredients. The same is true for SAMPLE Magnesium

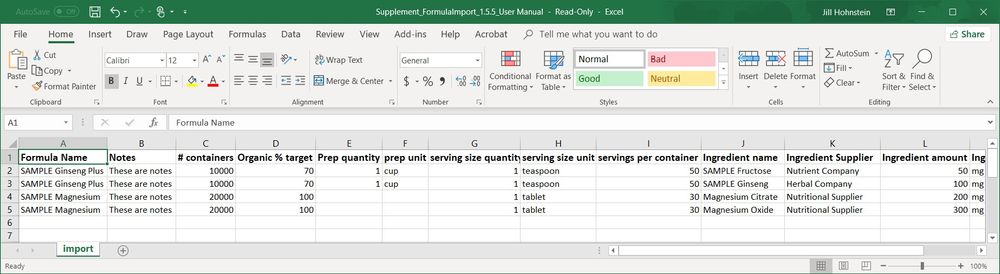
Make sure cell values are formatted as numbers, general or date. The Import Wizard reads all numerical values as numbers. So, for example, if the field is defined in excel as percent, the program will read 100% as 1, which is probably not what you intend.

You can import more than one Formula at a time. In this example, I'm importing SAMPLE Magnesium and SAMPLE Ginseng Plus.

Begin Import

  1. From the Database menu, click Import Data
  2. Browse and select your excel file.
  3. Click OPEN. This will open the file in the Import Wizard
  4. Choose Formula to move to the next screen. 

Select Rows 

  1. Select the header row. This will be the row with the data field names in it, like Name, Amount, Supplier, etc. (Most of the time it’s the top row, so the wizard automatically selects the top row.)
  2. Click Next. (Cancel can be selected before the import process to abort the import.)
  3. Select which data rows you wish to export.
  4. Click Next
  5. Set up the field mapping.
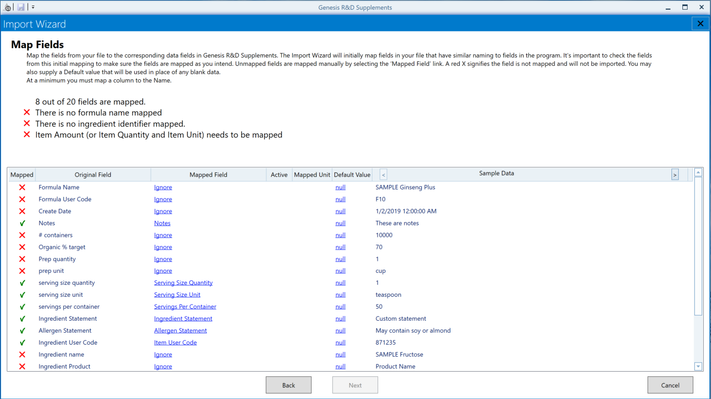
Field Mapping

  1. In the top section, a red X will highlight any fields that are mandatory to complete the import. Formula Name is always a required field to map. All fields listed with a red X in the top section must be mapped in order for the import to continue.. 
  2. Map remaining fields. The mapping data appears in columns. The mapped fields will be in the order listed on the import spreadsheet. The program will attempt to map fields with the same name. Program mapped fields should be checked for accuracy. The import wizard will remember mapped fields to assist with future imports. Not all fields must be mapped, but only mapped fields will be imported. Mapped fields are designated with a green check mark. Unmapped fields are designated with a red X.

To map a field

  1. Click the link under the Mapped Field column. (It will say "ignore" if nothing has been mapped.)
  2. Click the radio button next to the type of field to be mapped (User-added field or Ingredient Attributes.) Sometimes the Wizard will find the match right away. Click “show all” to see all fields that are available to map.
  3. Select the best option.
  4. When you've finished mapping the fields, click Next.

Validation

This page will show you if you have any errors that would cause the import to fail. Example: Name conflict. This would indicate that you have an existing database item with the same name. 

If the Validation says everything is OK, click Next to begin the import.

Import

This will tell you when the Import is complete. Click Exit to return to the Genesis Supplements program. Click New Import to select another file to import. Select Search to return to the Open search screen.


On this page:

COLUMN DETAILS

Mapped

  • Red X indicates an unmapped fields
  • Green check indicates a mapped field.

Original field name

  • What appears on the import spreadsheet header row.

Mapped field

  • Field names from the software

Active

  • This column is used for the ingredient import, it can be ignored for the formula import.

Mapped unit

  • For some fields the program will prompt for the entry of a unit.

Default value

  • Null (no value) is the default value for the fields. This can be overwritten

Sample data

  • Click on the right/left arrows to scroll through the ingredient data listed in the spreadsheet


FIELD TYPES DEFINED

Allergens
This section lists all of the allergens available in the program. Search for an item in the search box or scroll to see all of the items in a list. Click on one of the items to select it. To add the name listed in the Original Field as a new allergen, select New Allergen. In the excel spreadsheet, an “x” in the field designates that the allergen is present. The following field inputs may be used to designate that the allergen is not present: blank, 0, f, no, null, none, false, inactive. Use this option to designate allergens that are not accounted for in the ingredients. Ingredient allergens will carry through to the formula level.

Groups
This section lists all of the groups available in the program. Search for an item in the search box or scroll to see all of the items in a list. Click on one of the items to select it. To add the name listed in the Original Field as a new group, select New Group. In the excel spreadsheet, an "x" in the field designates that the ingredient is in that group. The following field inputs may be used to designate that the ingredient is not in the group: blank, 0, f, no, null, false, inactive.

User Added Fields
This section lists all of the user added fields available in the program. Search for an item in the search box or scroll to see all of the items in a list. Click on one of the items to select it. To add the name listed in the Original Field as a new user added field, select New User Added Field.

Formula Attributes
This section lists all of the formula attributes available in the program. Search for an item in the search box or scroll to see all of the items in a list. Click on one of the items to select it. Available formula attributes are listed below.

  • Active: This designates whether the ingredient is active or inactive. In the excel spreadsheet, an "x" in the field designates that the ingredient is active. The following field inputs may be used to designate that the ingredient is inactive: blank, 0, f, no, null, false, inactive.
  • Allergen Statement: This information imports into the Custom Allergen Statement field.
  • Creation Date: The creation date for the formula.
  • Formula Name: The name of the formula
  • Ingredient Statement: This information imports into the Custom Ingredient Statement field
  • Item Name: The name of each ingredient, exactly as it appears in the database
  • Item Product Name: The product name for each ingredient, exactly as it appears in the database
  • Item Supplier Name: The supplier name for each ingredient, exactly as it appears in the database
  • Item Quantity: The amount of ingredient in the formula (a number)
  • Item Unit: The unit that describes the Item Quantity
  • Item User Code: The user code for each ingredient, exactly as it appears in the database
  • Notes: The Notes for the formula
  • Number of Containers: The number of containers in the formula batch
  • Organic Target Percentage: The formula percent organic target (enter a number)
  • Prepared Amount: This is entered as Preparation Amount (one field) or as Preparation Quantity and Preparation Unit (two fields).
    • Prepared Amount: The preparation amount for the formula (eg: 1). When prompted select the unit that corresponds to the amount.
    • Prepared Quantity: The preparation amount (eg: 1)
    • Prepared Unit: The unit that corresponds to the amount entered into the Preparation Quantity column.
  • Serving Size Amount: This is entered as Serving Size Amount (one field) or as Serving Size Quantity and Serving Size Unit (two fields)
    • Serving Size Amount: The serving size amount for the formula (eg: 1). When prompted select the unit that corresponds to the amount.
    • Serving Size Quantity: The serving size quantity (eg: 1)
    • Serving Size Unit: The unit that corresponds to the amount entered into the serving size quantity field.
  • Servings per Container: The formula servings per container
  • User Code: The formula user code.


©2022 ESHA Research